Monday, March 12, 2018

Concert Ticket Pillow


Created this concert ticket pillow for a friend to give to her daughter's Godmother.  She loved how it turned out. 

Dabbing Unicorn Shirts

The Dabbing Unicorn Shirts were a blast to make.  The printed Siser ðŸŒˆ HTV was so fun to work with. Ordered it from #heattransfervinyl4u Used Black Siser Easyweed for the words and unicorn outline, Gold Siser Easyweed for the horn and ðŸŒˆ for the mane. I used Design Space and the slice & contour tools to get the pieces just right. I did use Illustrator to place the letters the way I wanted them. The font is "Oh Shoot". I have a Mighty Press heat press that I use to adhere all HTV.  


Monday, November 14, 2016

Elves Are Everywhere!

The Elves Are Everywhere!  That is not an understatement to say the least.  I made some personalized elves with HTV and my Cricut Explorer Air 2 and a Heat Press.  I posted them for sale on a few local Facebook BST sites and here I am with so many elf orders, I might have to start Christmas early!!  Let me know if you want to order one, just email me at n9jack@yahoo.com. 


Monday, November 7, 2016

Crafty Halloween

It was a Crafty Halloween this year.  We made custom t-shirts, tootsie pop ghots and Mummy earrings out of Shrinkie Dinks!!  Loved those.

Monday, November 2, 2015

How Have You Bean?

How Have You Bean? Card

A nice simple "How Have You Bean" card with brown ribbon, a brown ink pad, and a nice stamp set from HSN a few years back. (Probably 2013)  I hate when people tell me it was two years ago that they bought a cute dress that I really want to get today.  I am sorry about that, but this stamp set was a fun one and the coffee togo cup was the real reason I bought it.  I do have to cut it out by hand but it really isn't too bad.  The paper is a news print paper from Michael's, nothing special.  You could actually grab that off of a quick Pintrest search.  :)  #usingupscraps 

Enjoy, Jeanine @ Paper Craft or Prozac

Friday, October 30, 2015

Somewhere In Time: A Steampunk Prom

Somewhere In Time, A Steampunk Prom

Somewhere In Time - Center Pieces

 I know what you are think, a Steampunk Prom?  I thought the same thing before we started MONTHS before prom actually began.  I never, before working for a high school, knew how long it actually took to prepare for prom.  No, not getting your hair done choosing the right dress.  But the work to make the center pieces, the party favors, the decorations, the everything.  Oh it takes forever and the planning must start as soon as school starts.  


Somewhere In Time - Favors

200 Party favors were made by our students using SVG files from SvgCuts.com , SAL2, Cricut Expressions, and a Cuttlebug.  The students love putting them all together.  These take about a week to complete with the center pieces.  What a great accomplishment to finish them all. 

Somewhere In Time - Hot Air Balloon DecorationSomewhere In Time - SignSomewhere In Time - Steampunk Balloon

The large decorations where cut out of Styrofoam board.  The students would draw out the desired shapes on the foam board then use a hot knife to cut the foam.  Once they had the desired shape the painting began.  Students would paint and then hot glue on beads and sequence to make the decorations sparkle under the twinkle lights.  The only part the students did not participate in was the actual set up.  The teachers and parents do this every year. We always wanted the students to be surprised.  Oh and how surprised they were.  They loved this prom.  There were so many hands that went into making our homemade proms so special.  We will miss them for years to come.  

Jeanine @ Paper Crafting or Prozac

Thursday, October 22, 2015

Fun in 1st Grade Banner

Fun in 1st Grade Banner - 

I had so much fun making this banner for the Fall Festival at my daughter's school.  Her school has a festival every fall for the scholars and family to attend.  Each grade hosts a booth that needs to be decorated.  I was asked on Monday if I could help with some decorations.  My first thought was to go to my own classroom and grab some Halloween items that I have in the closet and drop them off.  My crafting bug started biting me and I decided to get back into my craft room.  (My craft room is not a room I can even walk in, that will be a later post.)  Sooo, I grabbed a few tools, some paper and started playing around at the kitchen table. This was the outcome....


Fun In 1st Grade Banner

I ran a length of orange ribbon through the pieces before sending it off to school.  The next step was to add a few other decorations.  I pulled out some more tools and I ended up with about 9 of these pumpkins....


Pumpkins - Mini Monsters Cartridge

The colors did actually match, the difference in the two pictures was the absence of a flash in the first one. The Recipe I used was as follows:

Fun in 1st Grade Banner
We R Memory Keepers Banner Punch
Base Paper cut at 5.5" x 8.5"
Cherry Lemonade Cricut Cartridge 
Font cut at 5"
Paper was scrap that I had

Pumpkins
Cricut Mini Monsters Cartridge
Pumpkins cut at 5.5"
Cuttle Bug and Folders various
Paper was scrap that I had

Adhesive: Scotch ATG and Aleen's Craft Glue.

I hope you enjoy, I loved the cute pumpkin faces and was happy to play with the new We R Memory Keepers Banner Punch Board.  I see a future of many banners, Birthday, Thanksgiving, Christmas, oh my!!

Jeanine @ Paper Crafting or Prozac!

Saturday, June 14, 2014

Illustrator - I Love!

I might be in love with another program.  Illustrator!!  I took a mind blowing class last Saturday and learned so much that I can pass on to my students.  The funny thing was, while I was creating and playing around I found out I can create my own SVG files to cut with my SCAL.  How cool is that?  So my first flower in Illustrator.  I'll post a pic after I cut it!!

Almost looks like a fat gingerbread guy.  LOL


Friday, June 13, 2014

My First Attempt at Digital Scrap Booking

I have used Photoshop for years and just haven't gotten to actually pulling out my digital photos and putting something together.  So I stumbled upon Pixel Scrapper Digital Scrapbooking and downloaded this cute template, paper, and elements...  Love the site.  I'll list the items I used soon!


Robert repaired this little boat that someone was giving away for free.  He re-fiber-glassed it, painted it and then took it for it's maiden voyage in the pond at the sod farm.  He was so happy!!

Items Used were all from Pixel Scrapper Digital Scrapbooking
Template: marisaL-layout458
Anchor Paper: ps_marisa-lerin_35429_oceanside-anchor-paper_pu
Twine Bow: ps_marisa-lerin_22875_khaki-scouts-rope-bow_pu

I will be subscribing soon to pixelscrapper, I am in love with all the kits and bundles that I have seen on this site.  $10 per month, not bad!!

Wednesday, May 7, 2014

A Long TIME!

How Long Has It Been?? 


It has been awhile since I have been around.  I've been missing my crafting.  Well with Teacher Appreciation happening, I had to do something.  So since I teach Graphics and Web Design, I figured I would have a student create a Teacher App. Tag to attach to homemade cookies.  ;)


We chose to do it on an angle so we could print it out, cut it easily and hole punch it.  We printed them at 2"x2".  The culinary students cooked a boat load of cookies for all the teachers.  It was fun to work this the students from both programs.  :)  Use if you would like, just don't sell it (unless you send me the money.)

Enjoy!  Jeanine

Friday, September 7, 2012

More Pics of Summer Shirts

Okay, the shirts above were Tye Dyed using a technique from Disney Dreamer Designs: Mickey Mouse Head Tie Dyed T-Shirts blog post. (For some reason it Blogger will not let me Paste a link to her blog??) I would just do a google search to find them. They turned out AWESOME.


Wednesday, July 6, 2011

Day WHATEVER - Disney T-Shirts


Hello all, It has been a LONG time since my last post and a SHORT summer, I fear. But here is a project I did. We are heading out to Disneyland soon and I wanted to save some money on souvenirs. So, I decided to make shirts for both days. This set was made with a Mickey Head that I cut to fit a 12X12 Mat. I used Contact Paper as my stensil medium. Once I had all the cutouts stuck on the Shirts I used Tulip Fabric Paint in the pump spray bottles and went to town. I didn't want to cover EVERY square inch of the shirt so I left the tops white. It looked kind a like they were dipped that way to me. :O) I borrowed this idea from the last Family Fun Mag that came to the house. Good idea!!


I'll post the second set of shirts tomorrow or Friday. They are tye-dye. :O)

Wednesday, June 1, 2011

Day 5 - A New Outlook on Crafting


Okay, so yesterday I cleaned out my crafting room (really it's smaller then most bathrooms). So today I got down to business and made a few scrapbook pages. They are of my son's first few Halloweens.

(He saw them and said "Mom, Please tell me you are NOT hanging those up!" I said, "No sweetie", I just didn't mention I was putting them on the internet.)

I used the DCWV Boys Will Be Boys Paper Pack for both layouts and some string from the junk drawer. Enjoy!! Jeanine

Day 4 - Craft Room Disaster - FIXED


Okay, so I went to craft yesterday and was paralyzed by fear that everything on my crafting table would come crashing down and I would have to use my Aflac Accident Policy (might be nice to actually use it). Instead of doing my famous, close the door and worry about it tomorrow (Scarlet O'Hara and I get along swimmingly), I chose to do something about it. So I closed the door and went to IKEA and bought a shelving unit. I put it together and started organizing. It is not beautiful, but it is done and I know where stuff is. ~ Jeanine

Monday, May 30, 2011

Day 3 - Beachy Invite


Today, I figured it was time to get started on the invite I promised I would make for a friend. I hope she likes it. This was a prototype, I'll be using a salmon colored shimmer paper on the bottom and a light turquoise paper for the top layer. After looking at it I am thinking about using pearls instead of the clear crystals. I'll post the REAL one's after the event. :o)


Recipe:


  • Cricut


  • SCAL2


  • Cri-Kits Holder and Pen :o)


  • iRock


  • Mybeachboardersquare svg file (found online)


  • Paper, crystals


Take care, Jeanine

Sunday, May 29, 2011

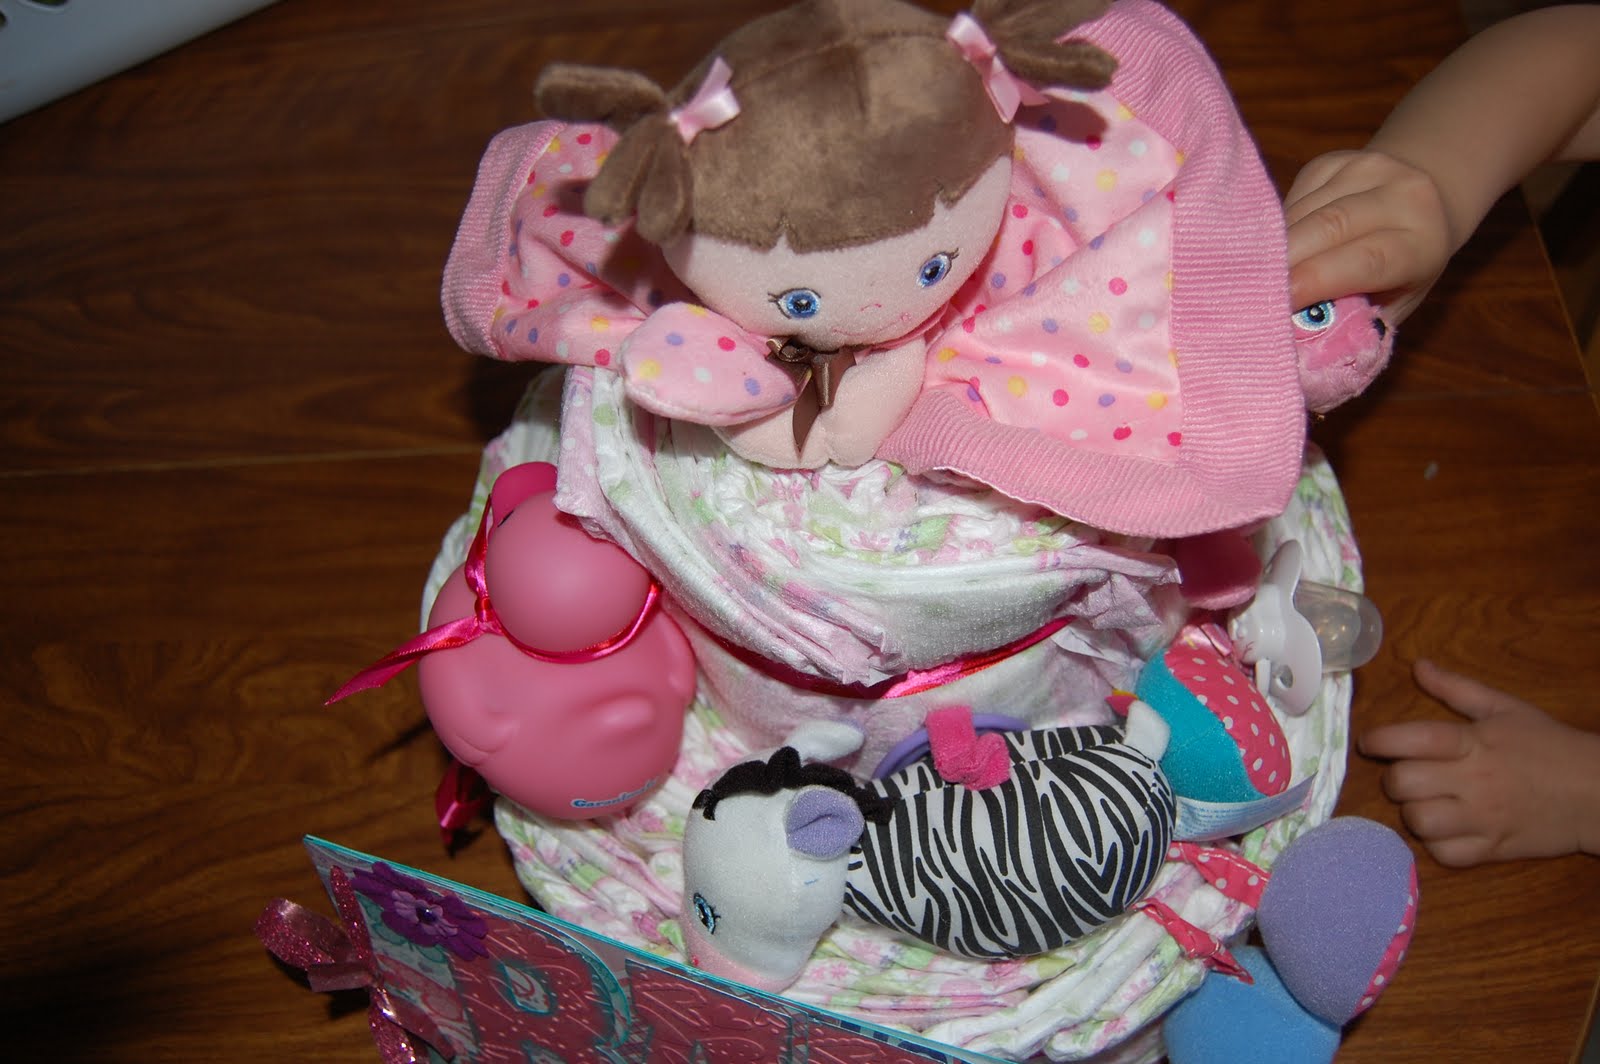
Day 2 - Diaper Cake


The Diaper Cake was another gift that I made for the baby shower we attended yesterday. I was able to find some cute diapers from Pampers that were pink. So cute. You can see my daughter's hand there on the right. She helped.


If you haven't made a Diaper Cake before you need a large pack of diapers, tape, and ribbon. I used painters tape. You roll the diapers up like a cinnamon roll, adding a new diaper ever roll or so. Where does the tape come in? I used it on the bottom layer to keep the roll together. I taped the diapers together at different points. Once you are done rolling them up, you tie them with a long ribbon. Last but not least, you can stuff Baby Items in to the cake.


Recipe:


  • Box of Pampers Diapers (Size 3)

  • Tape

  • Ribbon

  • Cute Baby Items for stuffing

  • The Baby Wordbook is listed in Day 1 of my Blog. :O)


I did find a video to help people see how the cakes are made. http://www.youtube.com/watch?v=T1Gv4j_kBD4&feature=fvwrel Super easy. (There are a few different ways to do the cakes, you can search Diaper Cakes on YouTube to find one you like.)


Jeanine


Day 1 - Baby Word Book


Okay I started off my Craft - A -Day yesterday with a "Baby Wordbook". One of Robert's high school buddies is becoming a Grandpa and we were invited to the shower. So I made a Baby Wordbook. I found the cut file in the blogosphere a few months ago and knew I would use it.


I did make two of them. That is my new thing, to make two or more of all the things I make. That way I have a few things in my made box to use in a crafting emergency. LOL


Recipe:


Cricut


SCAL2


Baby wordbook cut file


DCWV Glam Girl Paper Pad


Cuttlebug


Sizzix Heart Folder


Ink for Edges


A Craft a Day - Summer

I've created a challenge for myself this summer. I am going to do a craft a day while on summer vacation. I originally wanted to do a scrapbook layout a day, but I know that will not happen. My hope is that most of the days will be layouts. But life does happen. Keep an eye out for each days craft. :O)

Jeanine

Thursday, April 14, 2011

Thinking of You


Made a quick card this morning for a friend. My craft room is a wreck, couldn't find my CuttleBug spacers or my ATG, so will have to clean it up this weekend. Anyhow, her card what made with Reflections Paper from Michaels, Fun Fur yarn, and Car Decals Cricut Cart. This is the first thing that I have made with this cartridge. I'll be doing some vinyl this weekend.


Have a great Day,

Jeanine

Wednesday, April 13, 2011

Summer Fun 2010


I just found a few projects of the Projects I did Summer 2010. I guess I'm really behind. LOL. Oh well, here you go!!